Batched Imputation for High Dimensional Missing Data Problems

High dimensional data spaces are notoriously associated with slower computation time, whether imputation or some other operation. As such, in high dimensional contexts many imputation methods run out of gas, and fail to converge (e.g., MICE, PCA, etc., depending on the size of the data). Further, though some approaches to high dimensional imputation exist, most are limited by being unable to simultaneously and natively handle mixed-type data.

To address these problems of either inefficient or slow computation time, as well as the complexities associated with mixed-type data, I recently released the first version of a new algorithm, hdImpute,  for fast, accurate imputation for high dimensional missing data problems. The algorithm is built on top of missForest and missRanger, with chained random forests as the imputation engine.

The benefit of the hdImpute is in simplifying the computational burden via a batch process comprised of a few stages. First, the algorithm divides the data space into smaller subsets of data based on cross-feature correlations (i.e., column-wise instead of row-wise subsets). The algorithm then imputes each batch, the size of which is controlled by a hyperparameter, batch, set by the user. Then, the algorithm continues to subsequent batches until all batches are individually imputed. Then, the final step joins the completed, imputed subsets and returns a single, completed data frame. 

Let’s walk through a brief demo with some simulated data. First, create the data.

# load a couple libraries
library(tidyverse)
library(hdImpute) # using v0.1.0 here

# create the data
{
set.seed(1234)

data <- data.frame(X1 = c(1:6),
X2 = c(rep("A", 3), 
rep("B", 3)), 
X3 = c(3:8),
X4 = c(5:10),
X5 = c(rep("A", 3), 
rep("B", 3)), 
X6 = c(6,3,9,4,4,6))

data <- data[rep(1:nrow(data), 500), ] # expand/duplicate rows

data <- data[sample(1:nrow(data)), ] # shuffle rows
}
Next, take a look to make sure we are indeed working with mixed-type data. 

# quick check to make sure we have mixed-type data
data %>% 
map(., class) %>% 
unique()

> [[1]] [1] "integer" [[2]] [1] "character" [[3]] [1] "numeric"
Good to go: three data classes represented in our data object. Practically, the value of this feature is that there is no requirement for lengthy preprocessing of the data, unless desired by the user of course.

Finally, introduce some NA’s to our data object, and store in d.

# produce NAs (30%)
d <- missForest::prodNA(data, noNA = 0.30) %>% 
as_tibble()
Importantly, the package allows for two approaches to use hdImpute: in stages (to allow for more flexibility, or, e.g., tying different stages into different points of a modeling pipeline); or as a single call to hdImpute(). Let’s take a look at the first approach via stages. 

Approach 1: Stages

To use hdImpute in stages, three functions are used, which comprise each of the stages of the algorithm: 

  1. feature_cor(): creates the correlation matrix. Note: Dependent on the size and dimensionality of the data as well as the speed of the machine, this preprocessing step could take some time. 

  2. flatten_mat(): flattens the correlation matrix from the previous stage, and ranks the features based on absolute correlations. The input for flatten_mat() should be the stored output from feature_cor().

  3. impute_batches(): creates batches based on the feature rankings from flatten_mat(), and then imputes missing values for each batch, until all batches are completed. Then, joins the batches to give a completed, imputed data set.

    Here’s the full workflow.

# stage 1: calculate correlation matrix and store as matrix/array
all_cor <- feature_cor(d)

# stage 2: flatten and rank the features by absolute correlation and store as df/tbl
flat_mat <- flatten_mat(all_cor) # can set return_mat = TRUE to print the flattened and ranked feature list

# stage 3: impute, join, and return
imputed1 <- impute_batches(data = d,
features = flat_mat, 
batch = 2)

# take a look at the completed data
imputed1

d # compare to the original if desired
Of note, setting return_mat = TRUE returns all cross-feature correlations as previously mentioned. But calling the stored object (regardless of the value passed to return_mat) will return the vector of ranked features based on absolute correlation from calling flatten_mat(). Thus, the default for return_mat is set to FALSE, as it isn’t necessary to inspect the cross-feature correlations, though users certainly can. But all that is required for imputation in stage 3 is the vector of ranked features (passed to the argument features), which will be split into batches based on their position in the ranked vector.

That’s it! We have a completed data frame returned via hdImpute. The speed and accuracy of the algorithm are better understood in larger scale benchmarking experiments. But I hope the logic is clear enough from this simple demonstration. 

Approach 2: Single Call

Finally, consider the simpler, yet less flexible approach of making a single call to hdImpute(). There are only two required arguments: data (original data with missing values) and batch (number of batches to create from the data object). Here’s what this approach might look like using our simulated data from before:

# fit and store in imputed2
imputed2 <- hdImpute(data = d, batch = 2)

# take a look
imputed2

# make sure you get the same results compared to the stages approach above
imputed1 == imputed2

Visually Comparing

Though several methods and packages exist to explore imputation error, a quick approach to comparing error between the imputed values and the original (complete) data is to visualize the contour of the relationship between a handful of features. For example, take a look at the contour plot of the original data.

data %>%
select(X1:X3) %>% 
ggplot(aes(x = X1, y = X3, fill = X2)) + 
geom_density_2d() + 
theme_minimal() + 
labs(title = "Original (Complete) Data")


Next, here’s the same plot but for the imputed set. 

imputed2 %>% 
select(X1:X3) %>% 
ggplot(aes(x = X1, y = X3, fill = X2)) + 
geom_density_2d() + 
theme_minimal(). + 
labs(title = "Imputed (Complete) Data")


As expected, the imputed version has a bit of error (looser distributions) relative to the original version. But the overall pattern is quite similar, suggesting hdImpute did a fair job of imputing plausible values.

Contribute

To dig more into the package, check out the repo, which includes source code, a getting started vignette, tests, and all other documentation.

As the software is in its infancy, contribution at any level is welcomed, from bug reports to feature suggestions. Feel free to open an issue or PR to request the change or contribute. 

Thanks and I hope this helps ease high dimensional imputation!

Tidy Visualization of Mixture Models in R

We are excited to announce the release of the plotmm R package (v0.1.0), which is a suite of tidy tools for visualizing mixture model output. plotmm is a substantially updated version of the plotGMM package (Waggoner and Chan). Whereas plotGMM only includes support for visualizing univariate Gaussian mixture models fit via the mixtools package, the new plotmm package supports numerous mixture model specifications from several packages (model objects).

This current stable release is available on CRAN, and was a collaborative effort among Fong Chan, Lu Zhang, and Philip Waggoner.

The package has five core functions:

  • plot_mm(): The main function of the package, plot_mm() allows the user to simply input the name of the fit mixture model, as well as an optional argument to pass the number of components k that were used in the original fit. Note: the function will automatically detect the number of components if k is not supplied. The result is a tidy ggplot of the density of the data with overlaid mixture weight component curves. Importantly, as the grammar of graphics is the basis of visualization in this package, all other tidy-friendly customization options work with any of the plotmm’s functions (e.g., customizing with ggplot2’s functions like labs() or theme_*(); or patchwork’s plot_annotation()).

  • plot_cut_point(): Mixture models are often used to derive cut points of separation between groups in feature space. plot_cut_point() plots the data density with the overlaid cut point (point of greatest separation between component class means) from the fit mixture model.

  • plot_mix_comps(): A helper function allowing for expanded customization of mixture model plots. The function superimposes the shape of the components over a ggplot2 object. plot_mix_comps() is used to render all plots in the main plot_mm() function, and is not bound by package-specific objects, allowing for greater flexibility in plotting models not currently supported by the main plot_mm() function.

  • plot_gmm(): The original function upon which the package was expanded. It is included in plotmm for quicker access to a common mixture model form (univariate Gaussian), as well as to bridge between the original plotGMM package.

  • plot_mix_comps_normal(): Similarly, this function is the original basis of plot_mix_comps(), but for Gaussian mixture models only. It is included in plotmm for bridging between the original plotGMM package.
Supported model objects/packages include:

  1. mixtools
  2. EMCluster
  3. flexmix
Supported specifications include mixtures of:

  1. Univariate Gaussians
  2. Bivariate Gaussians
  3. Gammas
  4. Logistic regressions
  5. Linear regressions (also with repeated measures)
  6. Poisson regressions

Take a look at the Github repo for several demonstrations.

Note that though plotmm includes many updates and expanded functionality beyond plotGMM, it is under active development with support for more model objects and specifications forthcoming. Stay tuned for updates, and always feel free to open an issue ticket to share anything you’d like to see included in future versions of the package. Thanks and enjoy!

A New Release of rIP (v1.2.0) for Detecting Fraud in Online Surveys

We are excited to announce the latest major release of rIP (v1.2.0), which is an R package that detects fraud in online surveys by tracing, scoring, and visualizing IP addresses. Essentially, rIP takes an array of IP addresses, which are always captured in online surveys (e.g., MTurk), and the keys for the services the user wishes to use (IP Hub, IP Intel, and Proxycheck), and passes these to all respective APIs. The output is a dataframe with the IP addresses, country, internet service provider (ISP), labels for non-US IP Addresses, whether a virtual private server (VPS) was used, and then recommendations for blocking the IP address. Users also have the option to visualize the distributions, as discussed below in the updates to v1.2.0.

Especially important in this is the variable “block”, which gives a score indicating whether the IP address is likely from a “server farm” and should be excluded from the data. It is coded 0 if the IP is residential/unclassified (i.e. safe IP), 1 if the IP is non-residential IP (hostping provider, proxy, etc. – should likely be excluded, though the decision to do so is left to the researcher), and 2 for non-residential and residential IPs (more stringent, may flag innocent respondents).

Including some great contributions from Bob Rudis, some of the key feature updates included in v1.2.0 of rIP are:

  • Added discrete API endpoints for the three IP services so users can use this as a general purpose utility package as well as for the task-specific functionality currently provided. Each endpoint is tied to an environment variable for the secret info (API key or contact info). This is documented in each function.
  • On-load computed package global .RIP_UA which is an httr user_agent object, given the best practice to use an identifiable user agent when making API calls so the service provider can track usage and also follow up with any issues they see.
  • A new plotting option that, when set to “TRUE”, produces a barplot of the IP addresses checked with color generated via the amerika package.
  • Users can now supply any number of IP service keys they wish to use (1, 2, or all 3), and the function will ping only the preferred IP check services (formerly, the package required all three keys or none to be entered).
  • For those interested in reading more and citing the package in published work, check out our recently published software paper in the Journal of Open Source Software.
Here is a quick demo of the package with some fake (auto-generated) IP addresses:
# Install and load rIP, v1.2.0
install.packages("rIP")
library(rIP)

# Store personal keys (only "IP Hub" used here)
ip_hub_key = "MzI2MTpkOVpld3pZTVg1VmdTV3ZPenpzMmhodkJmdEpIMkRMZQ=="

ipsample = data.frame(rbind(c(1, "15.79.157.16"), c(2, "1.223.176.227"), c(3, "72.167.36.25"), c(4, "5.195.165.176"),
                             c(5, "27.28.25.206"), c(6, "106.118.241.121"), c(7, "231.86.14.33"), c(8, "42.56.9.80"), c(9, "41.42.62.229"),
                             c(10, "183.124.243.176")))
names(ipsample) = c("number", "IPAddress")

# Call the getIPinfo function to check the IPs
getIPinfo(ipsample, "IPAddress", iphub_key = ip_hub_key, plots = TRUE)
Running the code above will generate the following plot, as well as the dataframe mentioned above.

Note that to use the package, users must have valid personal keys for any IP service they wish to call via the function. These can be obtained for free at the corresponding IP check services.

Finally, we welcome contributions and reports of bugs either by opening an issue ticket or a pull request at the corresponding Github repository. Thanks and enjoy the package!

Advice to Young (and Old) Programmers: A Conversation with Hadley Wickham

I recently had the wonderful opportunity to chat with Hadley Wickham. He is an immensely prolific, yet humble guy who has not only contributed heavily to the advancement and development of R as a language and environment, but who also cares and has thought a lot about the process of doing data science the right way.

As a result, he has given many interviews on this “process” and his approach to data science and programming in R, mostly on the technical side of things. So, when I spoke with him, I wanted to frame the conversation for a broader audience, in large part due to the rapid expansion of people who are using R, most of whom engage very little with the programming wing of the community. Though this expansion of R users is a great thing on many dimensions, it has the potential to create a cohort of frustrated, self-taught programmers.

So, I am sharing Hadley’s responses to my questions in this blog for three main reasons: first and foremost, in an effort to offer a life-raft of sorts to people just getting started with (and frustrated by) R; second, to try and bridge the applied side of R users with the programming side of R users; and third, in the spirit of the open source foundation of R, to speak openly and plainly about the basics of approaching programming in R, and then how to keep going when you run into problems.

Importantly, though this conversation is intentionally non-technical and aimed at beginning programmers and R users, there are many great points and ideas for all programmers to consider, regardless of levels of proficiency and comfort with R. I have highlighted (via bold text) several of these particularly practical and valuable points throughout.

A final technical note: I edited a few places to make the conversation more amenable to reading and for the purpose of a blog post. I did not, however, change any of the substantive content of Hadley’s responses, as you will note from the conversational style of the responses, virtually all of which are verbatim. Enough of me. Here is some advice from Hadley Wickham to young (and old) programmers.

  • First, what is your role at R-Studio?

I am the chief scientist at R-Studio. I don’t really know what that means, or what chief scientists do. But I basically lead the teams that look after the Tidyverse, which is a set of packages for doing data science in R. So, my teams have a mix of roles, but there is some research in thinking what we should be working on, a bunch of programming, and also a bunch of education, like helping people understand how things work, webinars, books, talks, and Tweets.

  • Why R? How did you come to it and why should other people be convinced?

When I started learning R, the reason was simple: it was the only open source programming language for statistics. That’s obviously changed today, with programs and languages like Python, Java Script, and Scala.

So why R today? When you talk about choosing programming languages, I always say you shouldn’t pick them based on technical merits, but rather pick them based on the community. And I think the R community is like really, really strong, vibrant, free, welcoming, and embraces a wide range of domains. So, if there are like people like you using R, then your life is going to be much easier. That’s the first reason.

And the second reason, which is both a huge strength of R and a bit of a weakness, is that R is not just a programming language. It was designed from day 1 to be an environment that can do data analysis. So, compared to the other options like Python, you can get up and running in R doing data science, learning much, much less about programming to get started. And that generally makes it like easier to get up and running if you don’t have formal training in computer science or software engineering.

  • Let’s transition to Tidyverse, as you just mentioned. First, could you explain a bit behind the approach of the Tidyverse, from processing and management, to analysis in R?

The Tidyverse is a collection of R packages with the goal being, once you’ve learned one package in the collection, learning the other packages should be much easier. And what that means is that there is a deep, underlying philosophy and unity where you can learn things in one package and apply the same ideas elsewhere. So, it just means that your naïve ideas about what a function is going to do or how to tackle a problem should be fairly good, because you can draw on your experiences. Things are designed consistently in such a way where your experiences with other functions apply to new functions. So, for example, one of the ideas that underlies many, many packages in the Tidyverse is this idea of “tidy data,” which is a really simple idea, where when you are dealing with data science-y kind of data, you want to make sure that every variable is in a column, and then naturally every observation or case becomes a row. And if you put your data in that format once when you are doing data tidying, then you don’t have to hassle with it multiple times throughout the process.

  • In an interview in 2014 at UseR, you said one of your main goals was streamlining the process of getting from raw data to visualization quickly and efficiently, with “tidying” up the data being a key aspect of that. Presumably, you were talking about development of the Tidyverse. Do you think you’re there on that goal? Is there more to be expected? Did you meet it?

Yeah, we have made a lot of progress towards that goal. And 2014 was well before the idea of the Tidyverse existed. And the biggest change in my thinking since then is thinking of the Tidyverse as a thing and not just individual packages, and then being consistent across packages. That’s playing off one of the things my team has been focusing on this year, and that’s consistency within the Tidyverse; not adding a bunch of new features or creating new packages. But just thinking, “how can we make sure everything fits together as well as it possibly can?”

So, we are making good progress and there’s always more to do. And one of the things I find really rewarding is people sharing their experiences, like getting started with data and having the first really enjoyable experience when you go from a new dataset to some cool visualization with as little pain as possible. A neat illustration of that is the “TidyTuesday” hashtag [#tidytuesday] on Twitter. Every Tuesday they post a little data set and challenge, and then people tackle it with R and other tools and Tweet their results. Its really cool. [And anybody can do this, I guess?] Yeah exactly. Totally community run and driven.

  • Let’s shift and talk a little more conceptually about R and programming. There seems to be a ton of resources out there for R programmers given that its open source. This is naturally a wonderful thing. But I am wondering about beginning R programmers. Given that there is so much out there, how would you counsel a beginning programmer to sift through the resources to distinguish the signal from the noise?

So, I’m obviously biased in this recommendation, but I would say start with my book, “R for Data Science,” just because this is what it was designed for. It’s not going to teach you everything about R, and it’s by no means perfect, but I think it’s a really good way to get started. And it focuses relentlessly on giving you useful tools to help you understand data. It seems to be pretty popular and people seem to like it. And it’s free. You can buy a book if you want, but it’s free online.

After that, the other thing I would say is to try and find an R learning community. It’s much easier to learn and stay motivated when you are working with other people. And I think there’s lots of ways of doing that: look for a local meet up, like an R meet up or an R Ladies meet up in your area. There’s also the R-Studio community site.

Just find some way to find people like you who also are learning, because you can share your successes and your trials and your failures. It makes it much more likely that you will stick it out to the point where you will do something really useful.

  • I’ve noticed a theme in your work and how you approach package and resource development is addressing and fixing common problems in R. I’m curious how you hone in on these problems.

Yeah, I am curious too. I seem to be able to do it. I don’t really know exactly how. Part of it is I just talk to people and I travel a lot. I talk to people in different areas working on different problems, and I interact with a bunch of people on Twitter. And somehow that all feeds into my brain, and then ideas come out in a way I don’t fully understand. But it seems to work. I don’t want to break it. Also, I talk to people who are actually struggling with data analysis problems, and I also read a lot of other programming languages, computer science, and software engineering, because there’s basically nothing that I have done that’s not been done in some way, somewhere else before. So, it’s just finding a right idea that someone else has come up with and then applying it in a new domain; it’s tremendously valuable.

  • The use of R has seemed to explode within the past decade or so, moving far beyond the smaller world of computer programmers, spilling into many applied fields such as medicine, engineering, and even my own, political science. Having learned mostly on my own, I feel like there are two conversations going on, with a big gap, leaving the beginners to try and sift through complex worlds and tradeoffs. Specifically, in applied data analysis, the debate or tradeoff seems to be over using R versus another package like Stata. But from what I have observed, in the programming world, the debate seems to be over R versus other languages, such as Python, like you mentioned. So how should an applied analyst, someone who is not a programmer by training, navigate this tradeoff?

I think the tradeoff between Stata and R is: do you want a point-and-click interface, or do you want a programming interface? Point-and-click interfaces are great, because they lay out all of your options in front of you, and you don’t have to remember anything. You can navigate through the set of pre-supplied options. And that’s also it’s greatest weakness, because first of all, you are constrained into what the developer thought you should be able to do. And secondly, because your primary interaction is with a mouse, it’s very difficult to record what you did. And I think that’s a problem for science, because ideally you want to say how you actually got these results. And then simply do that reliably and have other people critique you on that. But it’s also really hard when you are learning, because when you have a problem, how do you communicate that problem to someone else? You basically have to say, “I clicked here, then I clicked here, then I clicked here, and I did this.” Or you make a screen cast, and it’s just clunky.

So, the advantages of programming languages like R or Python, is that the primary mechanism for communicating with the computer is text. And that is scary because there’s nothing like this blinking cursory in front of you; it doesn’t tell you what to do next. But it means you are unconstrained, because you can do anything you can imagine. And you have all these advantages of text, where if you have a problem with your code, you can copy and paste it into an email, you can Google it, you can check it and put it on GitHub, or you can share it by Twitter. There’s just so many advantages to the fact that the primary way you relate with a programming language is through code, which is just text. And so, as long as you are doing data analysis fairly regularly, I think all the advantages outweigh a point and click interface like Stata.

For R and Python, Python is first and foremost a programming language. And that has a lot of good features, but it tends to mean, that if you are going to do data science in Python, you have to first learn how to program in Python. Whereas I think you are going to get up and running faster with R, than with Python because there’s just a bunch more stuff built in and you don’t have to learn as many programming concepts. You can focus on being a great political scientist or whatever you do and learning enough R that you don’t have to become an expert programmer as well to get stuff done.

  • As people develop in programming, could you talk a little about the tradeoff between technical complexity and simplicity and usability?

That’s a big question. People naturally go through a few phases. When you start out, you don’t have many tips and techniques at your disposal. So, you are forced to do the simplest thing possible using the simplest ideas. And sometimes you face problems that are really hard to solve, because you don’t know quite the right techniques yet. So, the very earliest phase, you’ve got a few techniques that you understand really well, and you apply them everywhere because those are the techniques you know.

And the next stage that a lot of people go through, is that you learn more techniques, and more complex ways of solving problems, and then you get excited about them and start to apply them everywhere possible. So instead of using the simplest possible solution, you end up creating something that’s probably overly complex or uses some overly general formulation.

And then eventually you get past that and it’s about understanding, “what are the techniques at my disposal? Which techniques fit this problem most naturally? How can I express myself as clearly as possible, so I can understand what I am doing, and so other people can understand what I am doing?” I talk about this a lot but think explicitly about code as communication. You are obviously telling the computer what to do, but ideally you want to write code to express what it means or what it is trying to do as well, so when others read it and when you in the future reads it, you can understand some of the reasoning.

  • Any parting words of wisdom for R programmers or the community?

It’s easy when you start out programming to get really frustrated and think, “Oh it’s me, I’m really stupid,” or, “I’m not made out to program.” But, that is absolutely not the case. Everyone gets frustrated. I still get frustrated occasionally when writing R code. It’s just a natural part of programming. So, it happens to everyone and gets less and less over time. Don’t blame yourself. Just take a break, do something fun, and then come back and try again later.

A New Package (hhi) for Quick Calculation of Herfindahl-Hirschman Index scores

The Herfindahl-Hirschman Index (HHI) is a widely used measure of concentration in a variety of fields including, business, economics, political science, finance, and many others. Though simple to calculate (summed squared market shares of firms/actors in a single market/space), calculation of the HHI can get onerous, especially as the number of firms/actors increases and the time period grows. Thus, I decided to write a package aimed at streamlining and simplifying calculation of HHI scores. The package, hhi, calculates the concentration of a market/space based on a supplied vector of values corresponding with shares of all individual firms/actors acting in that space. The package is available on CRAN.

The purpose of this blog post is to provide a quick overview of the package’s two key functions: hhi (calculation) and plot_hhi (visualization). 

Calculating HHI Scores

As the package is intended for simple, intuitive usage, the function requires only the name of the data frame and then the name of the variable corresponding with the market shares in quotation marks. With these placed directly in the command, calling the function hhi will generate the HHI score based on the values supplied, following the basic form,
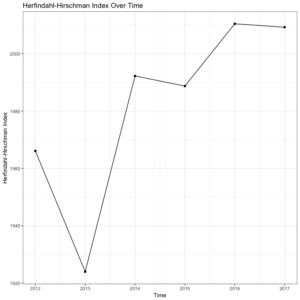
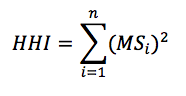
where MS is the market share of each firm, i, operating in a single market. Summing across all squared market shares for all firms results in the measure of concentration in the given market, HHI

Consider a simple application calculating the HHI for the men’s footwear market in the United States in 2017 (see and download the data file, “footwear.txt”, from my GitHub repo). Using market share data for every men’s footwear company operating in the U.S. in 2017 from Euromonitor Passport, we can calculate this market’s HHI with the following code:

 
# First, install the "hhi" package, then load the library
install.packages("hhi")
library(hhi)

# Next, read in data: US Men's Footwear Company Market Shares, 2012-2017
footwear = read.table(".../footwear.txt")

# Now, call the "hhi" command to calculate HHI for 2017
hhi(footwear, "ms.2017") # first the df, then the shares variable in quotes
Calling the function hhi gives us an HHI index value for men’s footwear in the U.S. in 2017 of 2009.25. You can corroborate this output manually by squaring each market share corresponding with each company in the data file in the year 2017, and then summing over each firm’s squared market share.

Often, the HHI is used as a measure of competition, with 10,000 equaling perfect monopoly (100^2) and 0.0 equaling perfect competition. As such, we can see that the U.S. men’s footwear industry in 2017 seems relatively competitive. Yet, to say anything substantive about the men’s U.S. footwear market, we really need a comparison of HHI scores for this market over time. This is where the second command comes in.

Visualizing HHI Time Series

The second key function in the package, plot_hhi, is a plotting feature allowing for quick and simple visualization of a time series of HHI scores. Usage is similarly straightforward, requiring only the name of the data frame, the name of the variable corresponding with the time indicator in quotation marks, and then the name of the variable corresponding with the market shares also in quotation marks. The package leverages ggplot2 to provide a visual rendering of the supplied vector of HHI values over the specified range of time. The function supports any measure of time, such as, years, quarters, months, etc. Note that plot_hhi is a relatively inflexible function meant for quick visual rendering of a vector of HHI scores over a period of time. For bigger and formal projects, users are advised to generate original plots with other plotting functions and packages beyond hhi to allow for greater flexibility in customizing visual output according to specific needs.

Let’s return to our men’s U.S. footwear example to see how the function works in practice. First, we need to calculate the HHI scores for each year in the data file (2012-2017), and store those as objects to make a data frame of HHI scores corresponding to individual years. Then, we simply call the plot_hhi command and generate a simple, pleasing plot of HHI scores over time. This will give us a much better sense of how our 2017 HHI score above compares with other years in this market. See the code below, followed by the output.

# First, calculate and store HHI for each year in the data file (2012-2017)
hhi.12 = hhi(footwear, "ms.2012")
hhi.13 = hhi(footwear, "ms.2013")
hhi.14 = hhi(footwear, "ms.2014")
hhi.15 = hhi(footwear, "ms.2015")
hhi.16 = hhi(footwear, "ms.2016")
hhi.17 = hhi(footwear, "ms.2017")

# Combine and create df for plotting
hhi = rbind(hhi.12, hhi.13, hhi.14, hhi.15, hhi.16, hhi.17)

year = c(2012, 2013, 2014, 2015, 2016, 2017)

hhi.data = data.frame(year, hhi)

# Finally, generate HHI time series plot using the "plot_hhi" command
plot_hhi(hhi.data, "year", "hhi")

These lines of code will give us the following plot of HHI scores for each year in the data set.


Interestingly, the men’s U.S. footwear industry seems to be getting slightly less competitive (higher HHI scores) from 2012 to 2017, on average. To say anything substantive about this trend, though, would obviously require more sophisticated methods as well as a longer time series. Yet, the value of the hhi package is allowing for quick calculation and visualization of HHI scores over time. You can download the package from CRAN or directly from the package installation context in RStudio. And as always, if you have any questions or find any bugs requiring fixing, please feel free to contact me.

As a final note, here are a few references for further reading on the HHI and its original calculation and intuition:

Herfindahl, Orris C. 1950. “Concentration in the steel industry.” Ph.D. dissertation, Columbia University.

Hirschman, Albert O. 1945. “National power and structure of foreign trade.” Berkeley, CA: University of California Press.

Rhoades, Stephen A. 1993. “The herfindahl-hirschman index.” Federal Reserve Bulletin 79: 188.


Thanks and enjoy!

Introducing purging: An R package for addressing mediation effects

A Simple Method for Purging Mediation Effects among Independent Variables

Mediation can occur when one independent variable swamps the effect of another, suggesting high correlation between the two variables. Though there are some great packages for mediation analysis out there, the simple intuition of its need is often ambiguous, especially for younger graduate students. Thus, in this blog post, it is my goal to introduce an intuitive overview of mediation and offer a simple method for “purging” variables of mediation effects for their simultaneous use in multivariate analysis. The purging process detailed in this blog is available in my recently released R package, purging, which is available on CRAN or at my GitHub.  

Let’s consider a couple practical examples from “real life” research contexts. First, suppose we are interested in whether committee membership relating to a specific issue domain influences the likelihood of sponsoring related issue-specific legislation. However, in the American context as representational responsibilities permeate legislative behavior, district characteristics in similar employment-related industries likely influence self-selection onto the issue-specific committees in the first place, which we also suggest should influence likelihood of related-issue bill sponsorship. Therefore, in this context, we have a mediation model, where employment/industry (indirect) -> committee membership (direct) -> sponsorship. Thus, we would want to purge committee membership of the effects of employment/industry in the district to observe the “pure” effect of committee membership on the likelihood of related sponsorship. This example is from my paper recently published in American Politics Research.

Or consider a second example in a different realm. Let’s say we had a model where women’s level of labor force participation determines their level of contraceptive use, and that the effect of female labor force participation on fertility is indirect, essentially filtered through its impact on contraceptive use. Once we control for contraceptive use, the direct effect of labor force participation may go away. In other words, the effect of labor force participation on fertility is likely indirect, and filtered through contraceptive use, which means the variables are also highly correlated. This second example was borrowed from Scott Basinger’s and Patrick Shea’s (University of Houston) graduate statistics labs, which originally gave me the idea of expanding this out to develop an R package dedicated to addressing this issue in a variety of contexts and for several functional forms.

These two examples offer simple ways of thinking about mediation effects (e.g., labor force (indirect) -> contraception (direct) -> fertility). If we run into this problem, a simple solution is “purging”. The steps to purge are to, first, regress the direct variable (in the second case, “contraceptive use”) on the indirect variable (in the second case, “labor force participation”). Then, store those residuals, which is the direct effect of contraception after accounting for the indirect effect of labor force participation. Then, we add the stored residuals as their own “purged variable” in the updated specification. Essentially, this purging process allows for a new direct variable that is uncorrelated with the indirect variable. When we do this, we will see that each variable is explaining unique variance in the DV of interest (you can double check this several ways, such as comparing correlation coefficients (which we will do below) or by comparing R^2 across specifications).

An Applied Example

With the intuition behind mediation and the purging solution in mind, let’s walk through a simple example using some fake data. For an example based on the second case described above using real data from the United Nations Human Development Programme, see the code file, purging example.R, at my GitHub repository.

# First, install the MASS package for the "mvrnorm" function
install.packages("MASS")
library(MASS)
# Second, install the purging package directly from CRAN for the "purge.lm" function
install.packages("purging")
library(purging)

# Set some paramters to guide our simulation
n = 5000
rho = 0.9

# Create some fake data
d = mvrnorm(n = n, mu = c(0, 0), Sigma = matrix(c(1, rho, rho, 1), nrow = 2), empirical = TRUE)

# Store each correlated variable as its own object 
X = d[, 1]
Y = d[, 2]

# Create a dataframe of your two variables
d = data.frame(X, Y)

# Verify the correlation between these two normally distributed variables is what we set (rho = 0.9)
cor(d$X, d$Y)
plot(d$X, d$Y) 
 

In addition to the correlation coefficient between the two variables being exactly as we specified (0.90), see this positive correlation between the two random variables in the plot below.


Now, with our correlated data created, we can call the “purge.lm” command, given that our data are continuous. Note: the package supports a variety of functional forms for continuous (linear), binary (logit and probit), and event count data (Poisson and negative binomial).

The idea behind the package is to generate the new direct-impact variable to be used in the analysis, purged of the effects of the indirect variable. To do so, simply input the name of the data frame first, followed by the name of the direct variable in quotes, and then the indirect variable also in quotes in the function. Calling the function will generate a new object (i.e., the direct variable), which can then be added to a data frame using the $ operator, with the following line of code:
 df$purged.var <- purged.var
Let’s now see the purge command in action using our fake data.
 
# Purge the "direct" variable, Y, of the mediation effects of X 
# (direct/indirect selection will depend on your model specification) 
purge.lm(d, "Y", "X") # df, "direct", "indirect" 
 
# You will get an automatic suggestion message to store the values in the df 
purged = purge.lm(d, "Y", "X") # Store as its own object 
d$purged = purged # Attach to df 
 
# Finally, check the correlation and the plot to see the effects purged from the original "Y" (direct) variable 
cor(d$X, d$purged) 
plot(d$X, d$purged) 

Note the correlation between the original indirect (X) variable and the new direct (Y) variable, purged of the effects of X, is -9.211365e-17, or essentially non-existent. For additional corroboration, let’s see the updated correlation plot between the X and purged-Y variables.


The purge command did as expected, with the correlation between the two variables essentially gone. You can download the package and documentation at CRAN. If you have any questions or find any bugs requiring fixing, please feel free to contact me. As this procedure was first developed and implemented (using the binary/logit iteration discussed above in the first example) in a now-published paper, please cite use of the package as: Waggoner, Philip D. 2018. “Do Constituents Influence Issue-Specific Bill Sponsorship?” American Politics Research, <https://doi.org/10.1177/1532673X18759644>

As a final note, once the intuition is mastered, be sure to check out the great work on mediation from many folks, including Kosuke Imai (Princeton), Luke Keele (Georgetown), and several others. See Imai’s mediation site as a sound starting place with code, papers, and more.

Thanks and enjoy!