Add shiny in quarto blog with shinylive

Shiny, without server

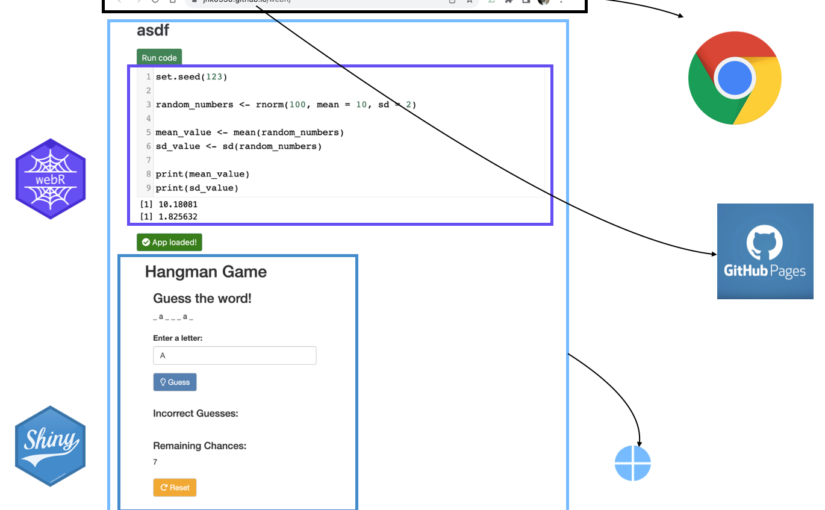
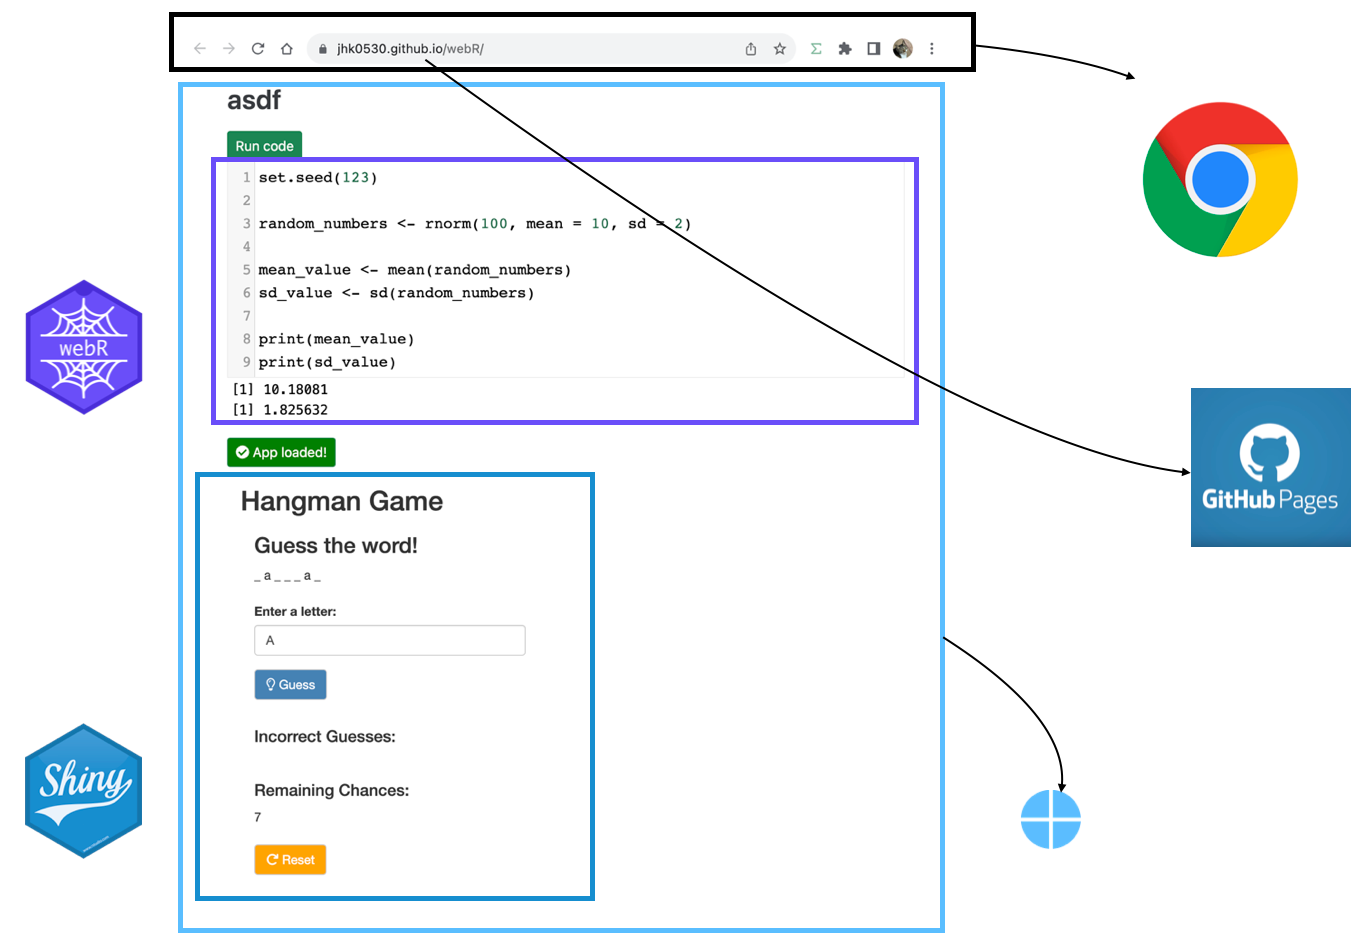
In previous article, I introduced method to share shiny application in static web page (github page)

At the core of this method is a technology called WASM, which is a way to load and utilize R and Shiny-related libraries and files that have been converted for use in a web browser. The main problem with wasm is that it is difficult to configure, even for R developers.

Of course, there was a way called shinylive, but unfortunately it was only available in python at the time.

Fortunately, after a few months, there is an R package that solves this configuration problem, and I will introduce how to use it to add a shiny application to a static page.

shinylive

shinylive is R package to utilize wasm above shiny. and now it has both Python and R version, and in this article will be based on the R version.

shinylive is responsible for generating HTML, Javascript, CSS, and other elements needed to create web pages, as well as wasm-related files for using shiny.

You can see examples created with shinylive at this link.


Install shinylive

While shinylive is available on CRAN, it is recommended to use the latest version from github as it may be updated from time to time, with the most recent release being 0.1.1. Additionally, pak is the recently recommended R package for installing R packages in posit, and can replace existing functions like install.packages() and remotes::install_github().

# install.packages("pak")

pak::pak("posit-dev/r-shinylive")


You can think of shinylive as adding a wasm to an existing shiny application, which means you need to create a shiny application first.

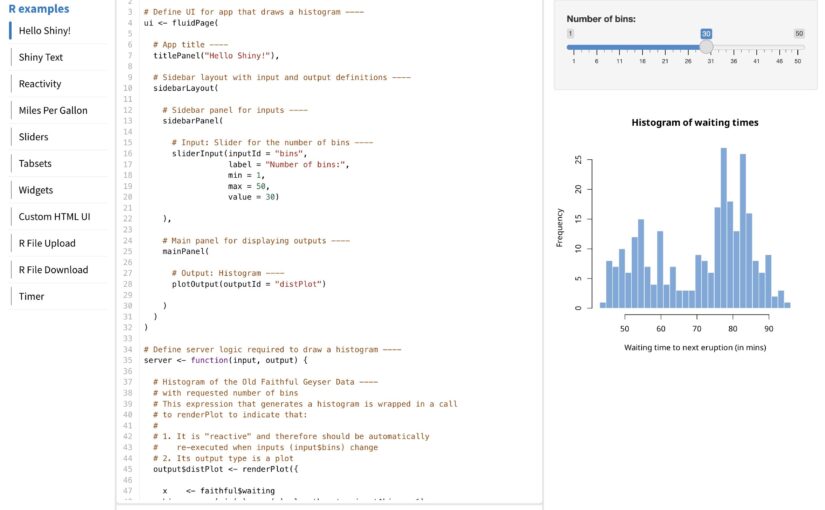
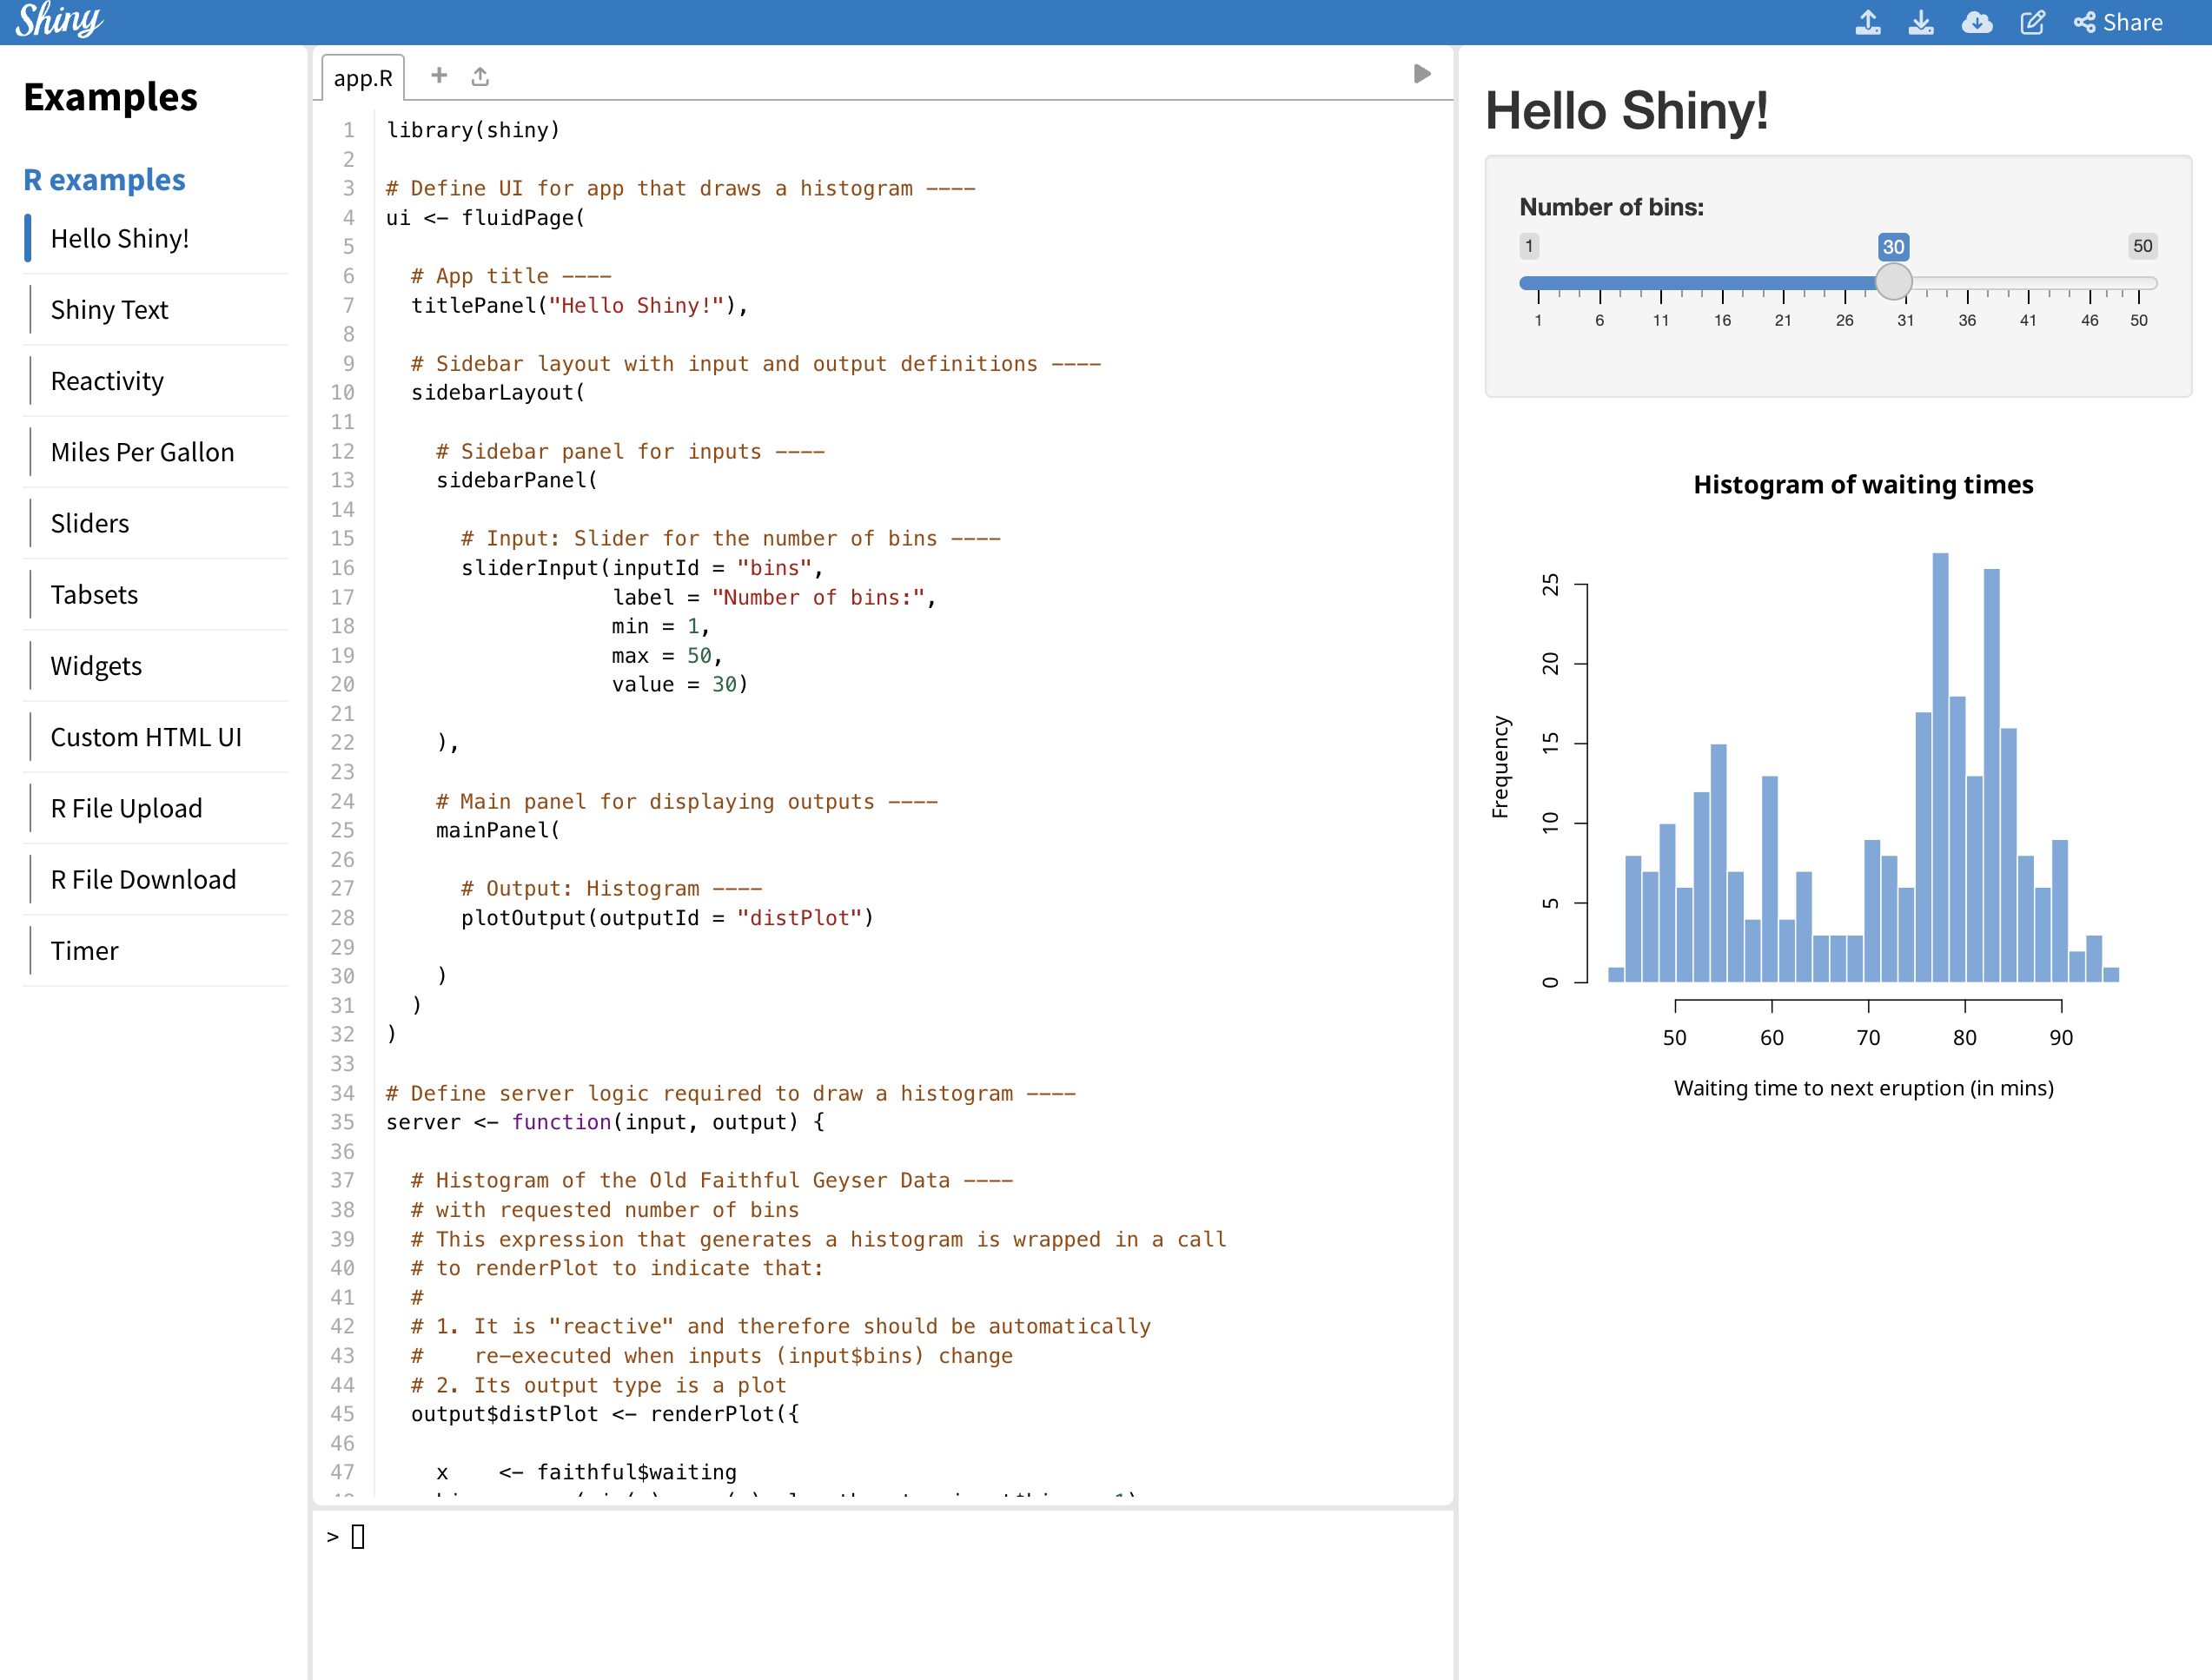
For the example, we’ll use the code provided by shiny package (which you can also see by typing shiny::runExample("01_hello") in the Rstudio console).
library(shiny)

ui <- fluidPage(

titlePanel("Hello Shiny!"),
  sidebarLayout(
  sidebarPanel(
    sliderInput(
      inputId = "bins",
      label = "Number of bins:",
      min = 1,
      max = 50,
      value = 30
    )
  ),
  mainPanel(
    plotOutput(outputId = "distPlot")
    )
  )
)

server <- function(input, output) {
  output$distPlot <- renderPlot({
  x <- faithful$waiting
  bins <- seq(min(x), max(x), length.out = input$bins + 1)
  hist(x,
    breaks = bins, col = "#75AADB", border = "white",
    xlab = "Waiting time to next eruption (in mins)",
    main = "Histogram of waiting times"
  )
  })
}

shinyApp(ui = ui, server = server)

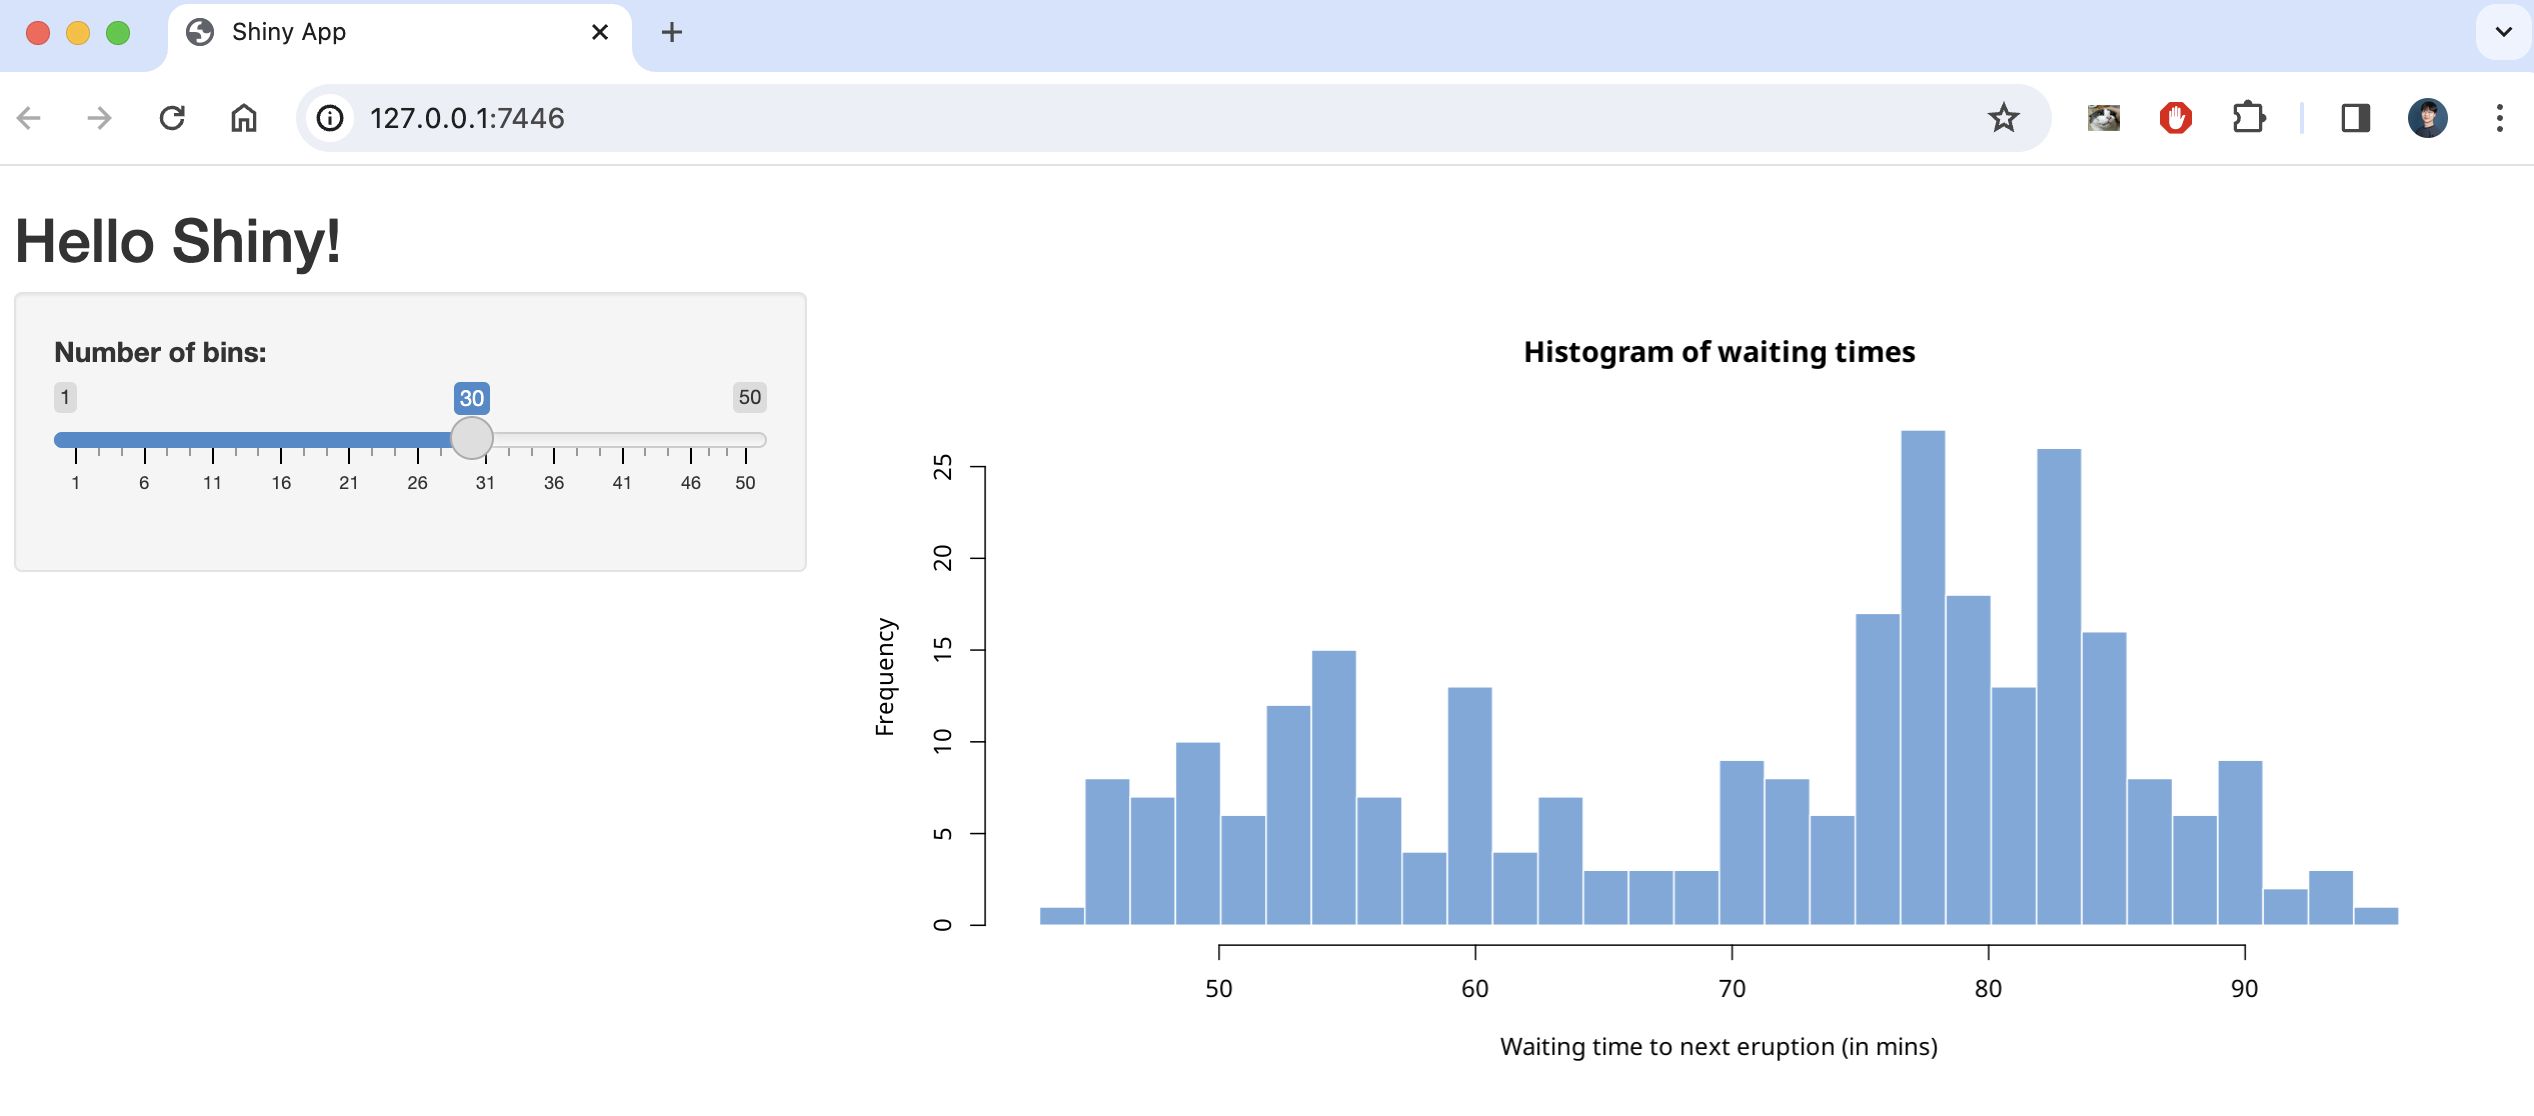
This code creates a simple shiny application that creates a number of histograms in response to the user’s input, as shown below.


There are two ways to create a static page with this code using shinylive, one is to create it as a separate webpage (like previous article) and the other is to embed it as internal content on a quarto blog page .

First, here’s how to create a separate webpage.

shinylive via web page

To serve shiny on a separate static webpage, you’ll need to convert your app.R to a webpage using the shinylive package you installed earlier.

Based on creating a folder named shinylive in my Documents(~/Documents) and saving `app.R` inside it, here’s an example of how the export function would look like

shinylive::export('~/Documents/shinylive', '~/Documents/shinylive_out')


When you run this code, it will create a new folder called shinylive_out in the same location as shinylive, (i.e. in My Documents), and inside it, it will generate the converted wasm version of shiny code using the shinylive package.

If you check the contents of this shinylive_out folder, you can see that it contains the webr, service worker, etc. mentioned in the previous post.


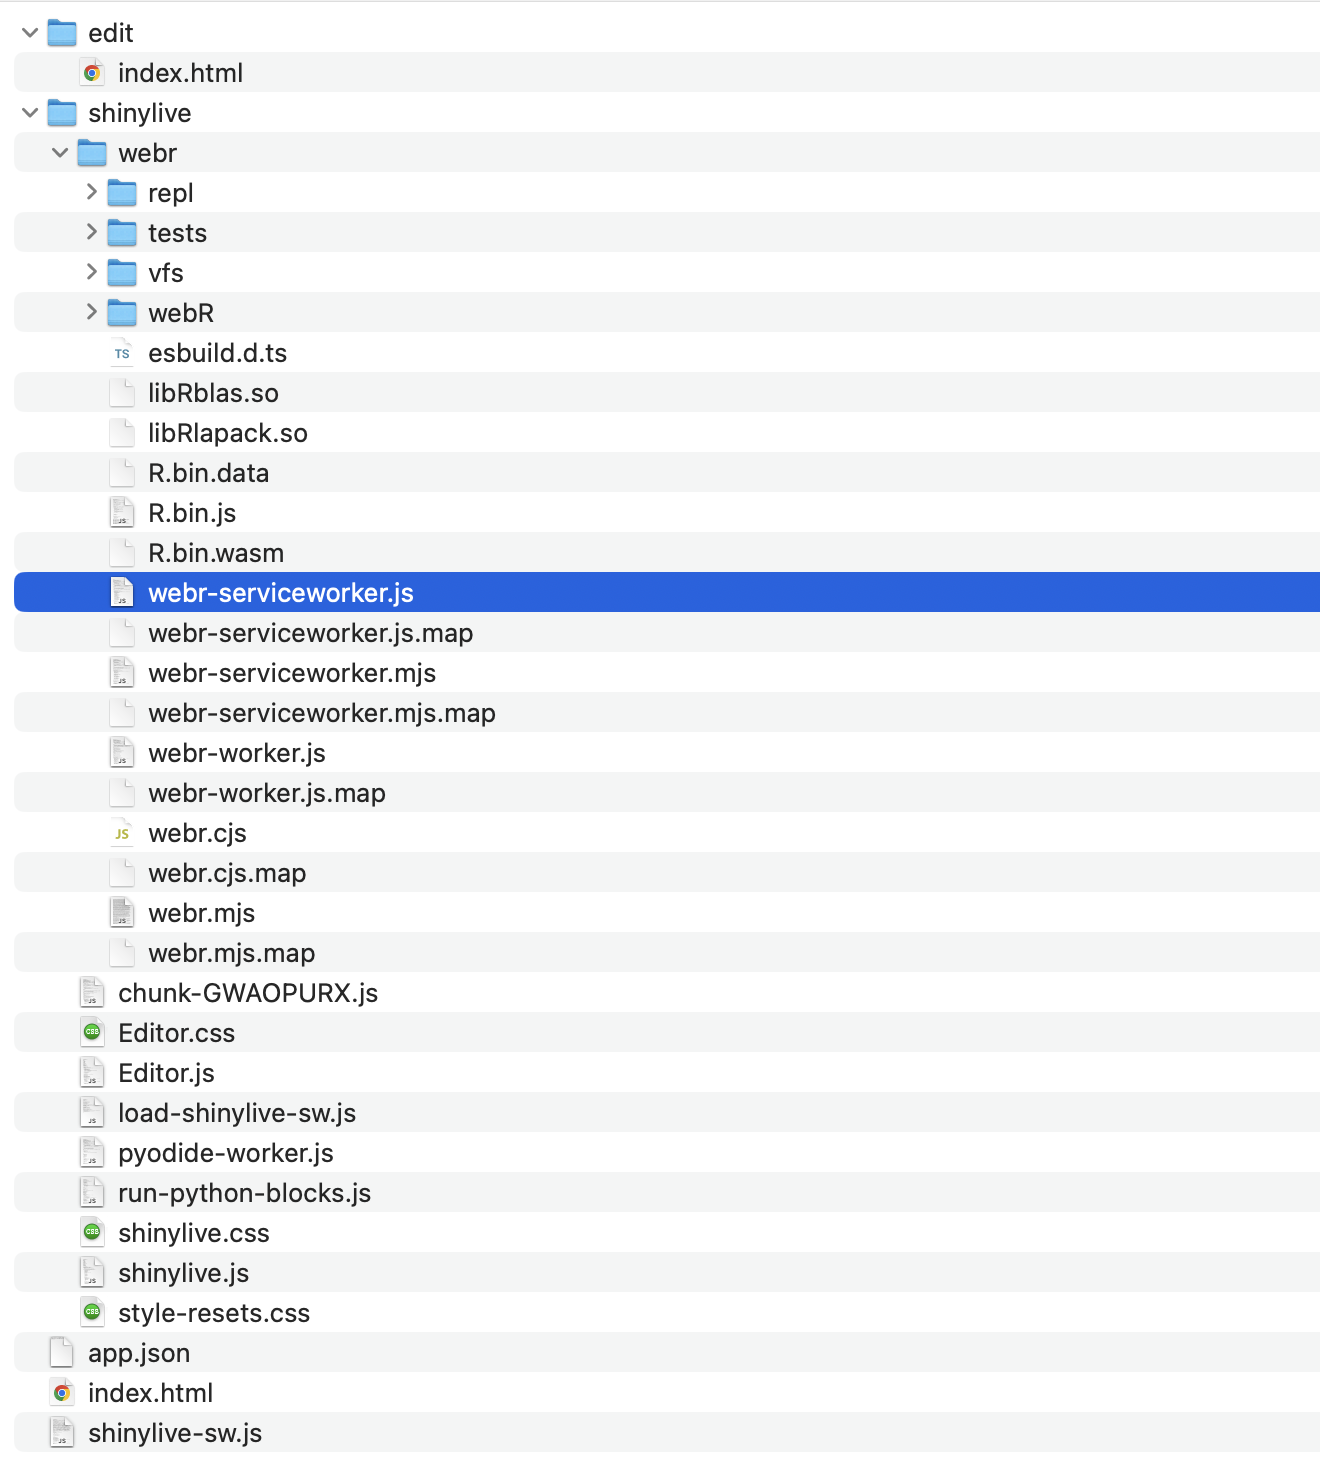
More specifically, the export function is responsible for adding the files from the local PC’s shinylive package assets, i.e. the library files related to shiny, to the out directory on the local PC currently running R studio.


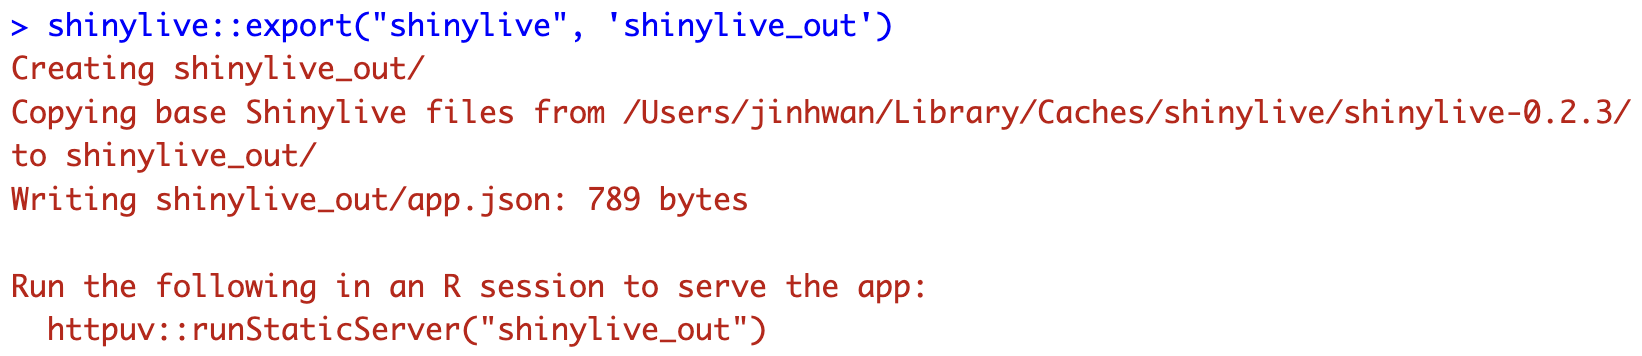
Now, if you create a github page or something based on the contents of this folder, you can serve a static webpage that provides shiny, and you can preview the result with the command below.

httpuv::runStaticServer("~/Documents/shinylive_out")

shinylive in quarto blog


To add a shiny application to a quarto blog, you need to use a separate extension. The quarto extension is a separate package that extends the functionality of quarto, similar to using R packages to add functionality to basic R.

First, we need to add the quarto extension by running the following code in the terminal (not a console) of Rstudio.

quarto add quarto-ext/shinylive

You don’t need to create a separate file to plant shiny in your quarto blog, you can use a code block called {shinylive-r}. Additionally, you need to set shinylive in the yaml of your index.qmd.

filters: 
- shinylive

Then, in the {shinylive-r} block, write the contents of the app.R we created earlier. 

#| standalone: true
#| viewerHeight: 800
library(shiny)
ui <- fluidPage(
  titlePanel("Hello Shiny!"),
  sidebarLayout(
    sidebarPanel(
      sliderInput(
        inputId = "bins",
        label = "Number of bins:",
        min = 1,
        max = 50,
        value = 30
      )
    ),
    mainPanel(
      plotOutput(outputId = "distPlot")
    )
  )
)
server <- function(input, output) {
  output$distPlot <- renderPlot({
    x <- faithful$waiting
    bins <- seq(min(x), max(x), length.out = input$bins + 1)
    hist(x,
      breaks = bins, col = "#75AADB", border = "white",
      xlab = "Waiting time to next eruption (in mins)",
      main = "Histogram of waiting times"
    )
  })
}
shinyApp(ui = ui, server = server)

after add this in quarto blog, you may see working shiny application.

You can see working example in this link

Summary

shinylive is a feature that utilizes wasm to run shiny on static pages, such as GitHub pages or quarto blogs, and is available as an R package and quarto extension, respectively.

Of course, since it is less than a year old, not all features are available, and since it uses static pages, there are disadvantages compared to utilizing a separate shiny server.

However, it is very popular for introducing shiny usage and simple statistical analysis, and you can practice it right on the website without installing R, and more features are expected to be added in the future.

The code used in blog (previous example link) can be found at the link.

Author: jhk0530

Customizing slides and documents using Quarto extensions workshop

Join our workshop on  Introduction to mixed frequency data models in R, which is a part of our workshops for Ukraine series! 


Here’s some more info: 


Title: Customizing slides and documents using Quarto extensions

Date: Thursday, January 11th, 18:00 – 20:00 CET (Rome, Berlin, Paris timezone)

Speaker:Nicola Rennie is a Lecturer in Health Data Science based within the Centre for Health Informatics, Computing, and Statistics at Lancaster Medical School. Her research interests include applications of statistics and machine learning to healthcare and medicine, communicating data through visualisation, and understanding how we teach statistical concepts. Nicola also has experience in data science consultancy and collaborates closely with external research partners. She can often be found at data science meetups, presenting at conferences, and is the R-Ladies Lancaster chapter organiser.


Description: Quarto is an open-source scientific and technical publishing system that allows you to combine text with code to create fully reproducible documents in a variety of formats. The addition of custom styling to documents can make them look more professional and recognisable. In the first half of this workshop, we’ll look at ways to customise HTML outputs (including documents and revealjs slides) using CSS, and ways to customise PDF documents using LaTeX. In the second half, we’ll discuss the use of Quarto extensions as a way of sharing customised templates with others, demonstrate how to install and use extensions, and show the process of building your own custom style extension.


Minimal registration fee: 20 euro (or 20 USD or 800 UAH)


How can I register?


  • Save your donation receipt (after the donation is processed, there is an option to enter your email address on the website to which the donation receipt is sent)

  • Fill in the registration form, attaching a screenshot of a donation receipt (please attach the screenshot of the donation receipt that was emailed to you rather than the page you see after donation).

If you are not personally interested in attending, you can also contribute by sponsoring a participation of a student, who will then be able to participate for free. If you choose to sponsor a student, all proceeds will also go directly to organisations working in Ukraine. You can either sponsor a particular student or you can leave it up to us so that we can allocate the sponsored place to students who have signed up for the waiting list.


How can I sponsor a student?


  • Save your donation receipt (after the donation is processed, there is an option to enter your email address on the website to which the donation receipt is sent)

  • Fill in the sponsorship form, attaching the screenshot of the donation receipt (please attach the screenshot of the donation receipt that was emailed to you rather than the page you see after the donation). You can indicate whether you want to sponsor a particular student or we can allocate this spot ourselves to the students from the waiting list. You can also indicate whether you prefer us to prioritize students from developing countries when assigning place(s) that you sponsored.


If you are a university student and cannot afford the registration fee, you can also sign up for the waiting list here. (Note that you are not guaranteed to participate by signing up for the waiting list).


You can also find more information about this workshop series,  a schedule of our future workshops as well as a list of our past workshops which you can get the recordings & materials here.


Looking forward to seeing you during the workshop!

Build serverless shiny application via Github page

Simple guide for simple shiny application 

TL;DR

I made shiny application in github page with quarto.

You can check code in my github repository and result, result2


How we use shiny

Shiny is R package to make user utilize R with web browser without install it.

So my company utilizes shiny to provide statistical analysis for doctors (who don’t know R but need statistics).


Behind shiny

As you know, shiny is consisted with 2 part. UI and Server

You may think just UI is channel to both get input (data) from user and return calculated output (result) to user.
and server is just calculator

It means, server requires dynamic calculation that may change, not fixed contents (it called as static web page)

To achieve dynamic calculation, there are several options.

We can use shinyapps.io, posit connect, or deploy own shiny server in other cloud like AWS / azure / GCP …

These options can be categorized into two main categories: free but with limited features, or feature-rich but paid.

There is no single right answer, but I use shinyapps.io in see toy level project or deploy using shiny server in company’s cloud server which is not just toy level.

RMarkdown and Quarto – Mastering the Basics workshop

Learn how to use RMarkdown and Quarto! Join our workshop on RMarkdown and Quarto – Mastering the Basics which is a part of our workshops for Ukraine series. 

Here’s some more info: 

Title: RMarkdown and Quarto – Mastering the Basics

Date: Thursday, May 25th, 18:00 – 20:00 CEST (Rome, Berlin, Paris timezone)

Speaker: Indrek Seppo, a seasoned R programming expert, brings over 20 years of experience from the academic, private, and public sectors to the table. With more than a decade of teaching R under his belt, Indrek’s passionate teaching style has consistently led his courses to top the student feedback charts and has inspired hundreds of upcoming data analysts to embrace R (and Baby Shark).

Description: Discover the power of RMarkdown and its next-generation counterpart, Quarto, to create stunning reports, slides, dashboards, and even entire books—all within the RStudio environment. This session will cover the fundamentals of markdown, guiding you through the process of formatting documents and incorporating R code, tables, and graphs seamlessly. If you’ve never explored these tools before, prepare to be amazed by their capabilities. Learn how to generate reproducible reports and research with ease, enhancing your productivity and efficiency in the world of data analysis.

Minimal registration fee: 20 euro (or 20 USD or 800 UAH)


How can I register?

  • Save your donation receipt (after the donation is processed, there is an option to enter your email address on the website to which the donation receipt is sent)
  • Fill in the registration form, attaching a screenshot of a donation receipt (please attach the screenshot of the donation receipt that was emailed to you rather than the page you see after donation).

If you are not personally interested in attending, you can also contribute by sponsoring a participation of a student, who will then be able to participate for free. If you choose to sponsor a student, all proceeds will also go directly to organisations working in Ukraine. You can either sponsor a particular student or you can leave it up to us so that we can allocate the sponsored place to students who have signed up for the waiting list.


How can I sponsor a student?

  • Save your donation receipt (after the donation is processed, there is an option to enter your email address on the website to which the donation receipt is sent)
  • Fill in the sponsorship form, attaching the screenshot of the donation receipt (please attach the screenshot of the donation receipt that was emailed to you rather than the page you see after the donation). You can indicate whether you want to sponsor a particular student or we can allocate this spot ourselves to the students from the waiting list. You can also indicate whether you prefer us to prioritize students from developing countries when assigning place(s) that you sponsored.

If you are a university student and cannot afford the registration fee, you can also sign up for the waiting list here. (Note that you are not guaranteed to participate by signing up for the waiting list).

You can also find more information about this workshop series,  a schedule of our future workshops as well as a list of our past workshops which you can get the recordings & materials here.


Looking forward to seeing you during the workshop!